DevSecOps Workshop
This fixed price advisory service is recommended for customers new to GitLab Ultimate, including upgrades from Premium, who are looking to understand core DevSecOps principles and how GitLab can instill them into their workflows to get the most out of GitLab Ultimate features and benefits. The workshop is particularly valuable for organizations that are new to application security practices or are looking to enhance their existing security workflows.
It includes a brief introduction to GitLab Security features, including the shift-left mindset concept (MR security approvals on dev branch), security dashboard, vulnerability management, in-house GitLab security scan capabilities, and scan execution and merge request approval policies.
The roadmapping sessions advise customers on how to plan for and adopt GitLab's application security features, helping clients to:
- Define security policies including:
- Types of security scans required for different types of projects.
- When to run each scan.
- Determine which projects should be scanned, and how to automate and enforce this.
- Understand what the GitLab Security Dashboard is and how to interact with its data.
- Define a vulnerability remediation strategy.
- Educate both developers and security team members on the new GitLab compliance process.
Sales and pre-launch considerations
- This service offering does not involve touching customer code at any point. We use a pre-built project and walk through security features in that project, dive deep into each of the security topics mentioned above, and then deploy the project to the customer environment as an example.
- This is a fixed price SKU service (not customized or variable), the scope and price estimate of this service is small.
- For any customer looking for a more advanced security focused engagement, they should look at our DevSecOps App Transformation service, whose scope is larger because it is a custom engagement and involves working on customer projects.
For fixed-price engagements, we use a service description document instead of the traditional SOW. This still has a list of all of the activities that will be covered in the engagement, but doesn't tie specific hours to specific tasks. You can find the DevSecOps Workshop Service Description here..
Delivery requires access to the GitLab demo environment and maintainer access to the DevSecOps Workshop Compliance Group. To receive access, generate credentials by following the demo system documentation. Join the #demo-systems slack channel with questions. If you are a partner please work with your Partner Delivery Manager or Services Practice team to import the project from the Demo Environment into LearnLabs adding appropriate permissions.
Professional Services team, please use the demo architect portal to request a workshop LearnLabs group to be created. First, use GitLab Admin login to sign in and follow the instructions to do a content/lab request and complete the form with the necessary information. Afterwards, you will be notified when the issue to create your group is created and then the group link when it is actually created. Please export/import the DevSecOps workshop project demos you'd like to use into the LearnLabs group and provide the partner with access permissions.
Target Audience
The target customer for this service offering is for either customers moving from Premium to Ultimate or a new Ultimate customer or an Ultimate seat expansion. The main service offering is meant for a PSE to show GitLab's security product capabilities via a quick demo, and then facilitate deep-dive sessions, Q&A, roadmapping, and/or strategic discussions about GitLab Security and how it can support and transform the customer's current security process and vision.
Unlike GitLab's education services, there is no limit to how many people from the customer organization can participate in this workshop, making it an excellent opportunity for cross-team collaboration.
Workshop Structure
The DevSecOps Workshop engagement typically breaks down into three main components:
-
Discovery/Inquiry (approximately 2 hours of meetings) - An open discussion to understand the customer's current security practices, tools, and challenges. This helps tailor the subsequent parts of the engagement to the customer's specific needs.
-
Demonstration (approximately 2 hours of meetings) - A hands-on showcase of GitLab's security capabilities and vulnerability management features using a pre-built project. This gives customers practical experience with the tools.
-
Roadmap Discussion - A strategic session to map the customer's specific challenges to GitLab Ultimate features, with a focus on shifting security left in the development process.
Demo Workshop Overview
This project lives on our customer success cloud environment.
This project is a pre-built GitLab project used to deliver the DevSecOps Workshop service. This particular example was built using the Node Express GitLab project template. There is no "application" to showcase - it's not needed to show off security features. Note that the sample project currently focuses on SAST and Secret Detection, with limited DAST capabilities, and does not include dependency scanning or Infrastructure as Code (IaC) scanning.
This project will be showcased to customers to teach them the following core GitLab Ultimate concepts and benefits:
- Shift-left mindset in MR workflow as well as DevSecOps best practices.
- Inclusion of GitLab Secret Detection and SAST templates as well as policies around using them.
- Creation of a scan execution policy and merge request approval policy.
- Built-in GitLab security dashboard and vulnerability remediation.
Delivery Steps
In case you prefer folloiwng along to a video, here's a recording of how to run through the project.
1. Access the DevSecOps Workshop Compliance Group in our sandbox environment and request maintainer access, and that should have everything you need for delivery. See prerequisites above for more details details.
2. Create a new project named "DevSecOps Workshop - JohnDoe", replacing "JohnDoe" with your name, in the DevSecOps Workshop Compliance Group based on the DevSecOps Workshop - Original project by either:
- Creating an export (Settings-->General-->Advanced-->Generate & Download Export), hitting the "New Project" button, and attaching the GitLab export file (*tar.gz)
- Cloning the DevSecOps Workshop - Original project down to your local machine, create a new blank project in the GitLab UI within the DevSecOps Workshop Compliance Group, and pushing it to "DevSecOps Workshop - JohnDoe", replacing "JohnDoe" with your name.
3. Showcase the .gitlab-ci.yml file on the default branch and briefly walk through the stages that exist for this NodeJs Express template project.
4. Create an MR approval rule by navigating to Settings-->Merge Requests-->Merge Request Approvals. Under the Approval Rules section, not Security Approvals, simply update the existing approval rule for "all eligible users" with a target of all branches so that the approvals required is 1, instead of 0. Additionally, in "Approval Settings" below, uncheck the box labeled "Prevent approval by author." While this is not considered best practice -- typically, it's recommended to require an approval from a user other than the author to ensure an independent review -- for the purpose fo this demo, it will simplify the process by allowing you to approve your own MR without needing to rely on someone else. Be sure to explain to the customer that, although this setup deviates from best practice, it is intended to streamline the demonstration process. Also, Explain how this MR workflow setup enables the shift-left mindset and its benefits (you will show this later in a merge request).
5. Create a security policy by navigating to Secure-->Policies. Select "New Policy" and then "Merge Request Approval Policy". Name the policy "SAST Policy Approval Rule" and optionally provide a description. In the Rules section, select the dropdown options set up the policy to follow: "When Security Scan SAST runs against the default branch with No exceptions and find(s) Any vulnerabilities that match all of the following criteria: severity is high or critical and status is new. Under the Actions tab, "Require 1 approval from: Individual users" and add yourself as the approver. Configure this policy with a merge request and merge it in.
-
You'll notice a separate security policy project has been created with a similar name to your project that has the policy yaml specified. Verify in your non security policy project Settings-->Merge Requests-->Security Approvals section, the SAST Policy security approval rule you created exists. This requires an extra approval to happen if a high or critical vulnerability is discovered in the SAST scan. Explain how this MR workflow set up enables the shift-left mindset and its benefits (you will show this later in a merge request).
-
Note that only the
latesttemplates allow scanners to run in Merge Requests, so you have to explicitly set this as the default is to use thedefaulttemplate. Your resulting policy YAML in the policy project should then contain a block like this:
scan_execution_policy:
- name: Secret Detection and SAST Enforcement
  description: ''
  enabled: true
  rules:
  - type: pipeline
    branch_type: all
  actions:
  - scan: secret_detection
    template: latest
  - scan: sast
    template: latest
6. Create a second security policy by navigating to Secure-->Policies. Select "New Policy" and then "Scan Execution Policy". Name the policy "Secret Detection and SAST Enforcement". In the Actions tab, "Run a Secret Detection scan with the following options:" and leave the default settings. Add a second Action "Run a SAST scan with the following options" and leave the default settings. In the Conditions, "Triggers every time a pipeline runs for all branches with No exceptions.". Configure this policy with a merge request and merge it in. This will force those security scans to run on every commit, so that developers don't need to worry about writing the scans in themselves or not adhering to security rules.
7. Create a new branch called "demo" from the master or main branch. You can do this via the UI by navigating to Code-->Branches-->New branch. You can also do this locally by cloning the repository into your terminal (git clone), checking out a new branch named demo (git checkout -b demo), and setting the upstream branch (use the --set-upstream-to flag on git branch or git push after making the following changes). Add in these 2 changes:
- First, edit the secrets.txt file by either adding a space at the end or changing the last letter of each password to ensure the secrets detection scanner looks at this file (by default it only runs on files with a diff). This will purposefully break the secrets detection scan.
- In routes/index.js, add or uncomment the below line of code within the "router get" block right after the "res.render" line. This will purposefully break the SAST scan.
res.send('id: ' + req.params);
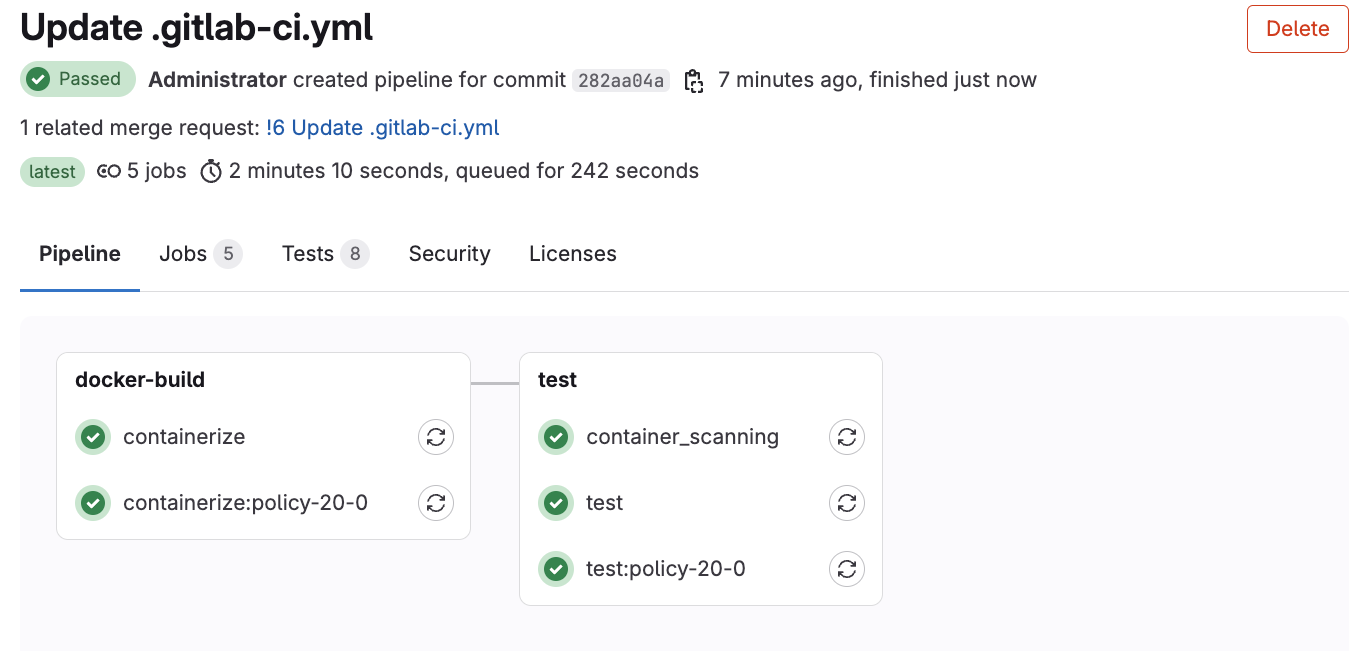
8. Commit those changes, and create a merge request. A new merge request pipeline should start that runs the dummy "build" job, and the jobs injected by the Scan Execution Policy. Note that the containerize and test jobs do not get run as they lack a rules: block that specify running in a Merge Request pipeline. This has been done to reduce the time taken for each pipeline in a demo environment.
- Use this time to explain why the security scans are running (sast, secrets detection) even though they aren't specified in the .gitlab-ci.yml file. Talk about the scan execution policy enforcing that pipeline to be run in addition to the application pipeline.
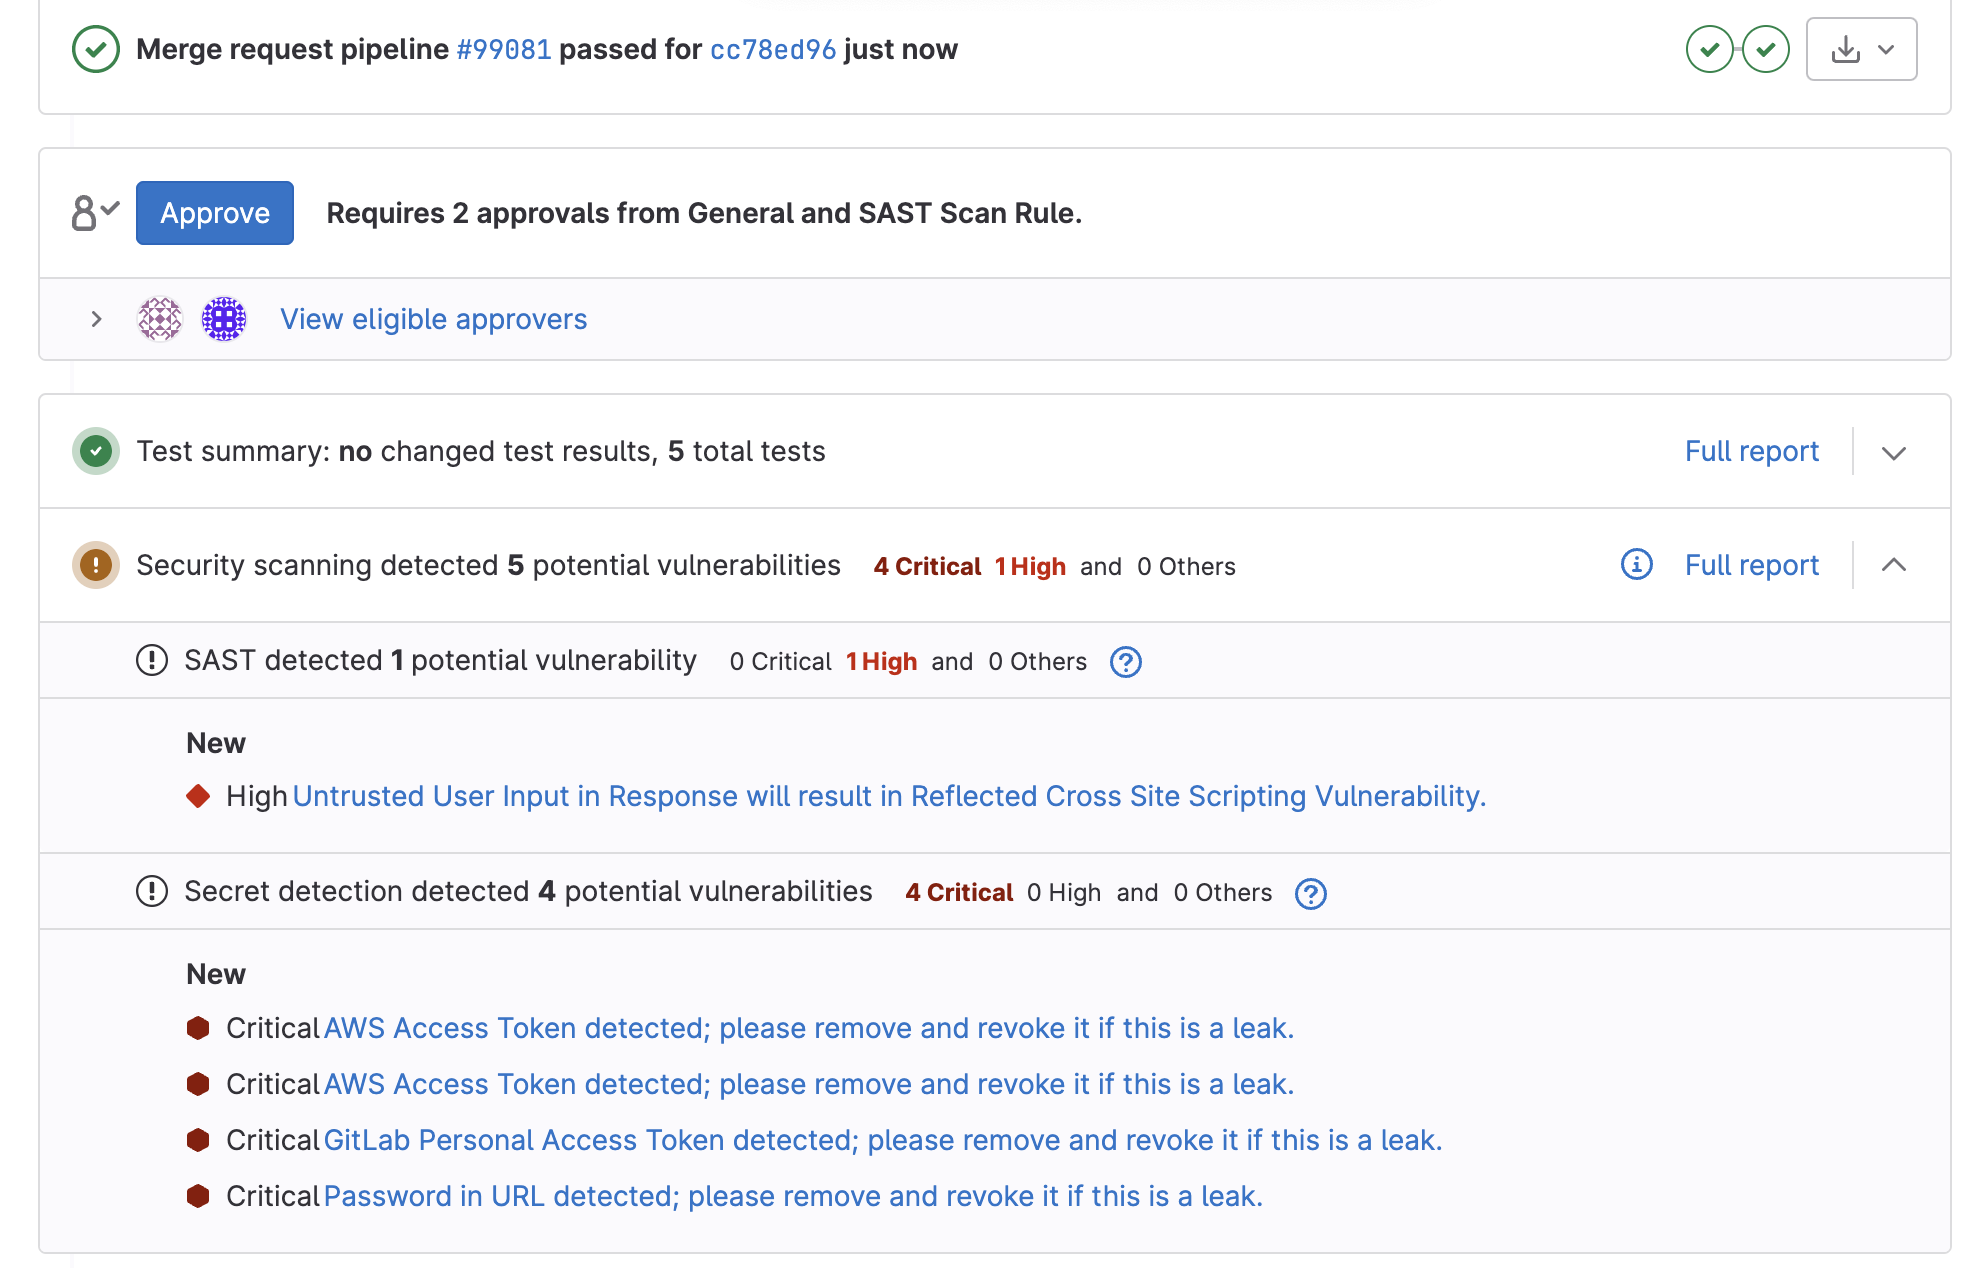
9. Now back to the MR UI, after the pipeline has completed, you should see that the 2 scanners detected several vulnerabilities, as shown in the image below. Note: With the updates to scan execution policies going in, this may not automatically populate on the MR widget just yet, but you can dig through the artifact report to see the vulnerabilities. Additionally, the merge request will be blocked because it requires 2 approvals: 1 from the general MR approval rule you created in step 4. The other approval is the SAST Policy Approval rule that was created in step 5 which is blocking the merge because a critical or high vulnerability was detected. Use this to explain how different user groups can be added as approvers depending on which security scan is run. Explain the value of seeing all of this information in the MR widget to ensure all checks and balances happen before code is merged.
10. For demo purposes, go ahead and approve the MR yourself (if configured correctly, it should cover both approval rules) and merge the MR into the default branch with the vulnerabilities and you should see a pipeline kicking off that runs build, containerize, test, and deploy jobs in a single pipeline.
11. Once the pipeline completes, navigate to Secure-->Security Dashboard and show the latest vulnerabilities that were introduced into the default branch with the last merge. Walk through the vulnerability report and it's capabilities, including the remediation process.
12. So far we have focused on setting up policies on a given project, many organisations need to enforce standards across many projects, this can be achieved with Compliance Frameworks. In the next steps we will demonstrate configuring Compliance Frameworks, Security Policies and Pipeline Execution Policies.
12.1 At group level, go to to Secure -> Compliance center. From the Frameworks tab, click the New Framework button, on the New compliance framework, enter a Name for the new framework, a Description, a Background color, ignore the compliance pipeline configuration and leave the 'Set as default' checkbox unchecked. Click the 'Add framework' button to complete the process.
12.2 When the framework is initially created it is empty, the next step is to create our policies and attach them to the framework.
12.2.1 In this step we are going to create a pipeline execution policy which enforces container scanning, this could be done with a Scan execution policy, however we want to demonstrate defining pipeline changes as part of a Compliane framework and how they can be enforced.
12.2.2 From the top level group, create a new project Pipeline Execution Policies. With the project created, create a new file container-scan.yaml and add the content below -
container_scanning:
  variables:
    CS_IMAGE: $CI_REGISTRY_IMAGE

include:
  - project: $CI_PROJECT_PATH
    ref: $CI_COMMIT_SHA
    file: $CI_CONFIG_PATH
  - template: Jobs/Container-Scanning.gitlab-ci.yml
Commit the changes with a suitable commit message.
12.2.3 From the top level group goto Secure -> Policies click the New policy button, scroll to Pipeline execution policy and click select policy. On the subsequent page enter a name and description for your policy, ensure the status is enabled and in the Policy Scope section select projects with compliance frameworks and then select the compliance framework created above. In the actions section select inject, select the PipeLine Execution Policies project, enter container-scan.yaml in the Link existing CI file field. Choose the appropriate branch for the File reference and leave the Add job name suffix set to On conflict. With all the information added, you can click the Update via merge request button and merge the changes.
12.2.4 Next, go back to the top level group Secure -> Compliance center. Click the projects tab and click the action button next to the demo project you have been using, This will open the select frameworks dialog, choose the compliance framework created above and click away from the Select frameworks dialog. Click on the frameworks tab and demonstrate to the participants that the Framework is now assiciated with your demo project.
12.2.5 The final step is to run a pipeline for your demo project, when the pipeline is triggered you will be able to demonstrate that the Container scanning job has been added to the test stage. Allow the pipeline to complete.
13. This is the end of the workshop portion of the service. It is expected that the attendees will have more questions about each of the security topics you've showed, so schedule deeper dive sessions as needed. The topics are listed below. Please clean up the individual project and security projects you may have created if no longer needed. Do not touch the Original Project.
14. The last part of this engagement involves moving the test project into the customer environment. To do this, you will need access to the customer GitLab instance. Have the customer create and provide access to an empty top-level group on their instance. Import the project and configure the merge request approval and scan execution policies as you did in the workshop. Consider recording the demo session so that the customer can review it again later, especially if they want to share it with team members who couldn't attend. In cases where the services delivery team lacks direct access to the customer's GitLab instance, consider other ways to deliver the example if the customer requests it.
Additional steps for an airgapped or security locked down environment (aka gitlab instance cannot access internet)
From our GitLab docs,
At a high-level, the security analyzers are delivered as Docker images and may leverage various package repositories. When you run a job on an internet-connected GitLab installation, GitLab checks the GitLab.com-hosted container registry to check that you have the latest versions of these Docker images and possibly connect to package repositories to install necessary dependencies.
In an offline environment, these checks must be disabled so that GitLab.com isn’t queried. Because the GitLab.com registry and repositories are not available, you must update each of the scanners to either reference a different, internally-hosted registry or provide access to the individual scanner images.
-
Add this configuration described in these SAST docs to the project in the customer environment to run SAST offline with locally imported docker images and not depend on GitLab's Container Registry.
-
Add this configuration described in these Secret Detection docs to the project in the customer environment to run Secret Detection scanning online using a local copy of the Secret Detection Docker image instead of GitLab's Container Registry.
Guide to Facilitate Deeper Dive On Each Concept
It's important to note that customers often face process challenges more than technical challenges. Be prepared to discuss topics such as:
- Organizational structure for security (many organizations don't have dedicated security personnel)
- Branching strategies and workflows
- GitLab group structure and organization
- Integration with third-party scanners (e.g., SonarQube for code quality)
- Secret push protection
Shift-Left Security Mindset + Merge Request Setup
Watch this video from the socumentation that summarizes the shift left mindset.
- The stages and jobs defined in the .gitlab-ci.yml file will run and output meaningful results (test outputs, logs, etc.) on the GitLab UI.
- Using Auto DevOps templates, we can include security scans with 1 line of code to run security checks and output logs to developers before code gets merged into the default branch. The templates run the scans in a test stage that is automatically created for you.
- Merge request approvals can be set up so that certain users or groups of users need to review a merge request before that branch is merged into a specific branch. This encourages code reviews, ensures high code quality, and prevents unwanted changes from being released.
- Customization allows for multiple approval rules to be created, different rules per branch, and rules based on security scan results.
Secret Detection
- GitLab's Secret Detection solution scans through source code to look for over 100 common patterns that would signify a token or password (i.e. access tokens, popular cloud provider keys, URLs, etc.).
- The GitLab solution spins up a container that runs the GitLeaks scan for you in the test stage.
- You can override certain predefined rules or create custom rules if you need to.
- By default, secret detection only scans commits, not the working tree, but the scan template can be configured to do a historical scan, scan all commits in a merge request (use the secret-detection.latest job for this), scan all branches, etc.
- You need a docker or k8s executor on a Linux based GitLab runner to use the secret detection GitLab template.
- You can configure the scan to omit certain paths, secrets, and use a specific version of the analyzer.
- The job outputs an artifact in JSON format which by default is available for 7 days.
SAST
- GitLab's SAST scanner checks out source code for vulnerabilities and outputs the report into a JSON artifact.
- Examples of SAST vulnerabilities include a dangerous class attribute or unsafe code that can lead to unintended code execution or code that is available to cross-site scripting (XSS) attacks where unauthorized access to session data can be attained.
- The SAST job runs in the test stage when including the template.
- Because the job automatically runs in the test stage, and by default does not contain the needs keyword (aka it does not depend on any other job), it will run after the build and/or containerize job is run and scan the entire working tree. Therefore, if anything from those jobs have been saved as artifacts or within the cache (i.e. a poetry install in a build stage), secrets detection could potentially detect dozens of vulnerabilities based on the dependencies that were installed.
- The solution here would to be to use the needs keyword to ensure secret detection runs first or encourage teams to run it in the .pre stage instead of the test stage.
- You need a docker or k8s executor on a Linux based GitLab runner to use the SAST GitLab template.
- GitLab's SAST scanner detects the language used in the project and automatically runs the corresponding analyzer. For example, GoSec runs when Go is detected, Bandit is run for Python projects, brakeman for Ruby, nodejs scan for Node.js projects, etc.
- False positive detection, currently is only available for Ruby and Go projects for Ultimate customers.
- Certain projects need to have code pre-compiled before running a SAST analyzer, and this can be achieved by outputting project dependencies into a working directory via the artifacts keyword, setting the COMPILE variable to false, and making sast depend on the build job with the needs keyword.
- You can configure the scan to omit certain paths, use a specific version of the analyzer, increase the debug log level, modify the depth of scan, pass credentials to a private repository, etc.
Security Dashboard & Vulnerability Remediation
- The GitLab Security Dashboard is the one stop view to track the results of the most recent GitLab security scans on the default branch.
- The dashboard provides a view of vulnerabilties over time at both the project and group level, and for the latter, will assign a grade based on the highest severity open vulnerability (does not include dismissed or resolved vulnerabilities).
Vulnerability Management
- The Vulnerability Report for a project shows details on each vulnerability including when it was detection, description, where in the code it was detected, linked issues, and available actions.
- The report can be filtered by date, severity, scanner, activity, and project.
- Here's a short video on vulnerability management.
- The default vulnerability status is Detected, which shows up as "Needs Triage" in the UI. Dismissing a vulnerability ensures it won't pop up on subsequent security scans while resolving a vulnerability will change its status, but allow the vulnerability to pop up again if the problem still exists.
Scan Result & Scan Execution Policies
Scan result policies are used to enforce a custom approval rule when a security scan detects a vulnerability.
- Scan result policies can be enforced at the group level with a corresponding security policy project and customizable policy.yml file that gets created within the group.
- Customize the approval group to ensure certain people need to approve an MR with vulnerabilities for it to be merged.
- This enables developers to collaborate with security to determine whether the vulnerability is a false positive, insignificant, or requires a code change.
- You can customize your scan result policy to only go in effect for a certain severity of vulnerability (low, medium, high, critical).
- The policies are only enforced when the target branch for the MR is a protected branch.
Scan execution policies can be used to schedule pipeline runs on the desired interval.
- Enforce these policies on all projects, whether or not they have a .gitlab-ci.yml file.
- These are the future direction for GitLab and will be customizable to allow for custom CI job inputs into the policies.
Discovery + Roadmapping
The engagement is 8 days, and yet the demo above and deep dive sessions should only take a few days to deliver. So what does the rest of the engagement entail?
-
Remember, the goal of this engagement is to ensure the customer leaves with a foundational understanding of GitLab Security features AND a path for how to transition to using it. While we don't touch customer code in this engagement, the remaining engagement time can and should be dedicated to the following activities. Time spent on each activity may vary as this is just a general outline of discussion points.
-
Setting expectations: It's crucial to clearly communicate what this service includes and what it doesn't. Some customers may have different expectations about what they've purchased, so clarify the scope early to avoid misunderstandings. For example, this engagement doesn't cover general CI/CD components beyond security-related aspects.
1. Understanding the customer's current security setup and design.
- What is your security team structure and group responsibility breakdown?
- Do they have separate teams for QA, application security, compliance/governance, etc.?
- Who is responsible for ensuring code in production is secure? How is this done today?
- What security tools are you currently using and what are they used for?
- Are the GitLab scanning solutions able to displace the customer's existing solutions?
- What technology stacks does your business use?
- Are there any applications that use languages or frameworks that aren't supported by GitLab?
- What are your current security requirements, processes, and/or policies?
- Do you have certain code scans that are required for certain applications or when code meets between environments?
- When, if at all, do you require manual intervention and review of code?
- How do you manage vulnerabilities today?
- Do you have a standard way of enforcing all applications run the required security scans?
- How do you manage security data across a large number of applications?
2. Identify why the customer is interested (i.e. what is not working so well with their current setup).
- Are there too many disparate tools to manage?
- Is there a lack of consistent process or security standardization between applications?
- Are there too many manual processes that drain the resources?
- Is there a lack of collaboration or even tensions between the security and development teams?
- Is it too difficult to manage security data and/or ensure all of the applications meet the necessary requirements?
3. Using the above information, discuss topic by topic how GitLab can solve the customer's issues.
- Examples:
- Security policies can achieve enforcement of standardized security templates across groups of applications.
- Shifting security to the left with merge request approvals combined with scan result policies can foster collaboration between security and developers to ensure all code is checked before moving to production.
- The security dashboard allows you to manage vulnerabilities over time across all of your projects, gather data about vulnerability remediation trends, and export that data for your own reporting purposes.
- Security can easily be automated within pipelines.
- All of the above can be done within a single platform aka GitLab, which simplifies the user experience for both developers and security team members.
4. Using the above discovery information, design the security vision of what the customer's end state GitLab setup could look like.
- Example:
- 10,000 foot view: GitLab SAST, DAST, Code Quality, Secrets Detection, and Container scanning are used to displace existing Snyk and Checkmarx implementation.
- Organization: Top level group contains centralized repository of security templates with different scanning setups that are automatically enforced to different types of projects. Developers don't need to worry about including any security scans in their code as these security pipelines are automatically injected into the application pipelines. The security team has a single location for all of the templates, which makes it easy to manage and update as needed. Developers can also easily contribute back to those templates through issues and merge requests. The necessary security folks will be automatically asked to review any application code MRs that violate a security policy.
- Workflow: Every code commit triggers a SAST and Secrets Detection scan. On merge request pipelines, additional Code Quality and Container Scans are run. There are different security policies assigned to differentiate between web applications, payment applications, business applications, etc., each with different templates to match the specific security requirements. Security professionals can use the Security Dashboard to pull reporting and trend data for vulnerabilities broken down by severity at both a group and project level.
- What is your security team structure and group responsibility breakdown?